🧩 What Are Sub-Accounts?
Sub-accounts are how you organize phone lines inside the Reseller Partner Portal.
You can think of them as folders for your lines:
-
Group lines by client, location, department, or campaign
-
Separate billing and analytics by sub-account
-
Make it easy to see which lines belong to which customer or use case
Every active line either:
-
Lives inside a specific sub-account, or
-
Lives in the Available Pool (unassigned lines that are ready to be assigned)
🎯 When to Use Sub-Accounts
Sub-accounts are helpful when you:
-
Manage multiple clients or brands
-
Run multiple campaigns with different teams
-
Need per-client billing summaries
-
Want to compare performance across groups of lines
Common examples:
-
Client ABC – Sales Team -
Client XYZ – Inbound Only -
Internal – Testing
📂 How to View Sub-Accounts
-
Log into the Reseller Partner Portal.
-
Go to the Sub-accounts section (or the area listing all sub-accounts).

-
You’ll see:
-
A list of all sub-accounts
-
Line counts per sub-account
-
An “Available” or “Available for Assignment” sub-account for unassigned lines
-
From here you can drill into:
-
Which lines belong where
-
How many lines are unassigned
-
Which sub-accounts are driving usage and cost
➕ How to Create a New Sub-Account
Use a new sub-account when you’re onboarding a new client, creating a new major campaign, or separating usage for billing/analytics.
-
Open the Sub-accounts section.
-
Click Create sub-account (or similar “New” / “Add” action).

-
Enter:
-
Sub-account Name (recommended:
Client – Use Case, e.g.Client ABC – Sales Campaign) -
Any required contact or internal reference details

-
-
Create Sub-Account.
Once created, you can start assigning lines into it.
🔁 Assigning & Moving Lines Between Sub-Accounts
You can assign lines when:
-
You’ve just requested new lines
-
You’re reorganizing existing clients or teams
-
You’re moving lines from the Available Pool into an active sub-account
Assign lines to a sub-account
-
Go to Sub-accounts or Lines (depending on where line actions live in your UI).

-
Find the line(s) you want to assign:
-
Newly provisioned lines
-
Lines currently in Available
-
-
Use the Add new line option.
-
Fill out all information
-
Confirm.
Once assigned:
-
The line now counts toward that sub-account’s billing and analytics
-
It will appear under that sub-account in invoices and reports
Move lines between sub-accounts
-
Locate the line in its current sub-account.
-
Choose Move / Change sub-account.
-
Select the new sub-account.
-
Confirm the change.
This is helpful when:
-
A client restructures their teams
-
You re-purpose a line for a different campaign
-
You need cleaner separation across accounts
📱 The “Available Pool” (Unassigned Lines)
The Available Pool is a system-generated sub-account for unassigned lines.

What it does:
-
Holds any lines that don’t yet belong to a specific sub-account
-
Appears as “Available” or “Available for Assignment” in sub-account lists
-
Shows up in billing summaries so you can see charges for unassigned lines
Typical flow:
-
You request new lines → they appear under Available
-
You then assign them to the correct sub-account(s) when ready
💸 How Sub-Accounts Affect Billing
Sub-accounts are deeply tied into billing:
-
Billing Summary
-
Charges are grouped by sub-account so you can see who is driving which costs
-
Unassigned lines appear under Available
-
-
Invoice Details
-
Each invoice breaks out:
-
Sub-account name
-
Line quantity per sub-account
-
Total cost per sub-account
-
Any discounts, prorations, or credits applied
-
-
This makes it easier to:
-
Recharge clients
-
Explain invoices
-
Audit changes when lines move between sub-accounts
🧮 How Sub-Accounts Affect Analytics
Each sub-account can have its own analytics story:
-
Total messages sent/received
-
Response rate
-
New and responded conversations
-
Volume limit usage
This lets you:
-
Compare performance across clients or teams
-
Spot underperforming or over-pressured groups
-
Decide where to add/remove lines or adjust messaging strategy
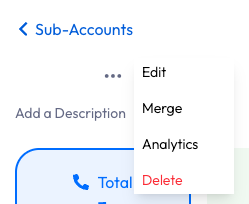
🗃️ Merging Sub-Accounts (Request-Based)
Merging sub-accounts is a high-impact operation and is typically done by request/approval, not as a casual click.
What happens in a merge:
-
All lines move into a target sub-account
-
Analytics roll up into that target sub-account
-
Billing for future cycles is associated with the merged sub-account
Important considerations:
-
Merges cannot be undone – review carefully before requesting
-
There may be a short processing timeline based on line count and complexity
Typical reasons to merge:
-
Consolidating multiple sub-accounts for the same client
-
Cleaning up legacy structures after an internal re-org
If your portal doesn’t allow self-service merging, you’d request this via your Partner Success Manager.
🗑️ Deleting Sub-Accounts (Request-Based)
Deleting a sub-account is also a controlled action.

Key behaviors:
-
There is typically a retention period before permanent deletion.
-
Any lines must be:
-
Moved to another sub-account, or
-
Explicitly disconnected/cancelled based on your agreement and process
-
Typical reasons to delete:
-
Client offboarding
-
Campaign completed and lines fully shut down
-
Cleanup of unused/empty sub-accounts
Always confirm:
-
All billing implications are understood
-
No active lines or traffic should remain in that sub-account
✅ Best Practices for Sub-Accounts
-
Use clear, descriptive names:
-
Client Name – TeamorClient Name – Use Case
-
-
Keep billing and analytics aligned:
-
Don’t mix multiple unrelated clients in one sub-account
-
-
Assign new lines out of the Available Pool promptly
-
Review sub-account usage regularly:
-
Remove old/unused sub-accounts
-
Merge only when it reduces confusion
-
-
Before requesting a merge or delete:
-
Double-check line assignments and any contractual obligations
-