Purpose:
The Organization Settings section allows Admins to manage default preferences, team branding, communication templates, and shared assets across the entire organization.
These settings apply to all team members unless customized individually.
How to Access Organization Settings
-
Log in to your Linq Admin Dashboard.
-
In the left navigation panel, click Settings under the Organization section.
-
You’ll see five main tabs:
-
General Settings
-
Virtual Backgrounds
-
Follow-Up Messages
-
Message Snippets
-
Hyper Linq
-
1. General Settings

Key Options:
-
Organization Name:
Displays your organization name across team pages and directories. -
Show opt-in marketing checkbox for new contacts:
Enables a GDPR-compliant opt-in checkbox for European users when capturing new leads or contact info. -
Show domain contacts:
When turned ON, allows users within the same domain (e.g.,@linqapp.com) to view each other’s contacts.
When OFF, only admins and assigned team members can view organization contacts. -
Organization Logo for All Teams:
Upload a logo that will appear across all team pages and shared templates.
2. Virtual Backgrounds
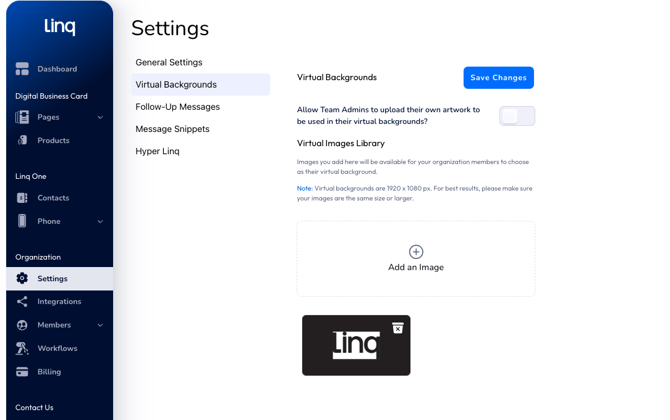
Create and manage branded backgrounds that your team can use in video calls.
Key Options:
-
Allow Team Admins to upload their own artwork:
Toggle ON to let team admins contribute background images. -
Virtual Images Library:
Upload your organization-approved backgrounds here.Recommended size: 1920 x 1080 px (or larger).
-
These images will be available for all members to use as their virtual backgrounds in the Linq app.
💬 3. Follow-Up Messages

You can configure both Text (SMS) and Email versions.
For SMS:
-
Customize the message that sends when a contact exchange occurs.
-
Use Variables like
kb-article-module-5,, andto personalize content. -
Example:
Hey ! Here’s kb-article-module-5’s contact. View their Linq Page here 👉 .
For Email:
-
Edit the Subject Line, choose to include the user’s Linq Signature or company logo, and personalize the message body.
-
Variables like
kb-article-module-5andauto-fill with user data. -
Example:
kb-article-module-5’s contact is attached! Save it to your device or view their Linq Page anytime: .
🧠 4. Message Snippets
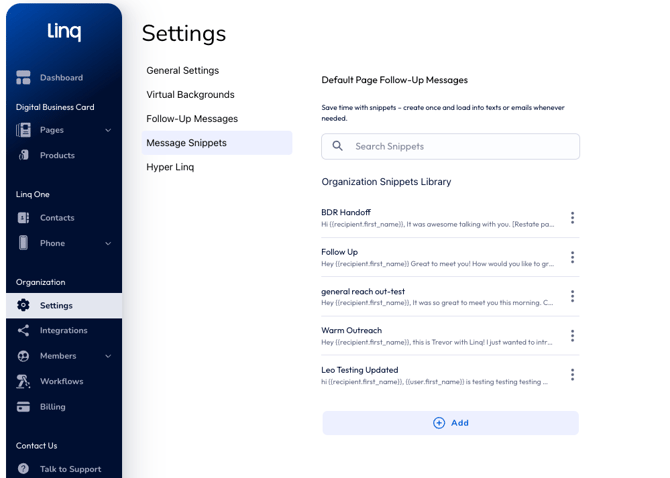
How to Use:
-
Click Add to create a new snippet.
-
Give it a Snippet Name and optional Subject (for emails).
-
Add message content in the Custom Snippet Content field.
-
Use the Look Up Available Variables button to insert dynamic placeholders (like
).
These snippets can then be selected during messaging, saving time and ensuring consistent communication.
⚡ 5. Hyper Linq

Key Option:
-
Use Default App Clip Settings for All Organization Members:
Toggle ON to apply a standardized App Clip experience across all users.
This ensures a consistent “Tap to Open” interaction when customers scan Hyper products.