👥 HR Integration with Entra ID (Azure AD) Directory Sync
Overview
Linq’s HR Integration allows your organization to connect directly to a variety of directories for directory syncing.
This ensures employee data — like names, titles, phone numbers, and photos — stays current across your entire Linq organization.
Prerequisites:
1. Linq One subscription
2.Activation of HR+SSO on subscription at extra cost
Available Providers
| Provider | Notes |
|---|---|
| Okta SAML | Most commonly used enterprise IdP |
| Entra ID (Azure AD) SAML | Microsoft’s cloud identity service |
| Google SAML | Works for Google Workspace orgs |
| ADP OpenID Connect | Ideal for ADP Workforce or ADP TotalSource users |
| Auth0 SAML | Used by teams already managing auth via Auth0 |
| CAS SAML | Supports schools and higher-education directories |
| ClassLink SAML | Common in education and nonprofit orgs |
| Cloudflare SAML | For orgs leveraging Cloudflare Access for identity |
| CyberArk SAML | Used in high-security enterprise environments |
| Duo SAML | Multi-factor authentication and identity provider |
| Custom SAML | Manual setup for unsupported IdPs |
| Custom OIDC (OpenID Connect) | For any OIDC-compliant provider (e.g., PingOne, OneLogin) |
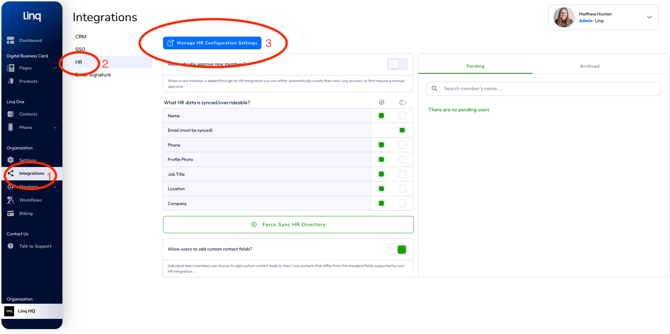
🧭 Navigating to HR Settings
You’ll manage HR integrations directly inside your Linq One admin dashboard.
To find it:
-
Log into your Linq One admin account.
-
From the left sidebar, click Integrations.
-
Select HR from the integrations list.
-
The HR dashboard includes:
-
Manage HR Configuration Settings (blue button at the top)
-
Auto-Approve Toggle
-
Team and Page Template Assignments
-
Pending / Archived User Tabs
-
Force Sync HR Directory button
-
💡 Tip: Your profile and organization name appear at the top-right corner (e.g., James Mayes · Admin · Liberty Energy Services).
⚙️ Setting Up HR Integration
Step 1: Connect Your Directory
In Integrations → HR → Manage HR Configuration Settings, connect Entra ID (Azure AD) as your directory provider.
You’ll see:
| Field | Example |
|---|---|
| Directory Provider | Entra ID (Azure AD) |
| Directory State | Active |
| Users Count | 100+ |
| Groups Count | 1 |
Once connected, Linq displays Directory Activated with a green checkmark.
Step 2: Configure Membership Behavior
Automatically Approve New Members
Toggle ON if you want new employees added immediately.
Toggle OFF if you prefer manual approval under “Pending.”

Step 3: Assign Teams and Templates (Optional if Automatic approval
-
New Member Team Assignment: Select from your existing teams.
-
New Member Page Template Assignment: Choose your organization’s page layout .

These settings determine where new users land and what their initial Linq page looks like.
Step 4: Choose Synced Attributes
You can control which HR fields are synced to Linq.
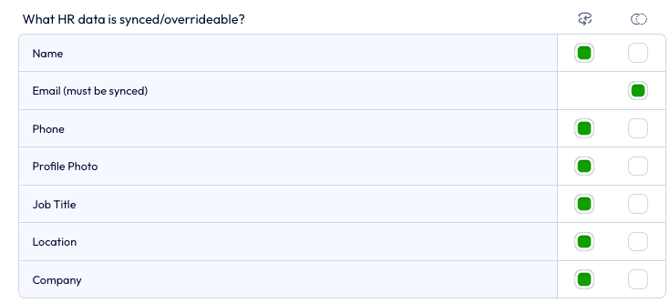
Click the Force Sync HR Directory button at the bottom to trigger a manual refresh at any time.

Step 5: Manage Pending Users
New users synced from HR appear under Pending:

-
Accept: Adds the user and creates their Linq account.
-
Archive: Moves the user to the Archived tab (they can be restored later).
You’ll also see timestamps for each pending addition, e.g.
name@domain.com — Added Oct 21, 2025
Step 6: Allow Custom Contact Fields (Optional)
At the bottom of the HR settings page, you’ll see the toggle:
Allow users to add custom contact fields?
When ON, team members can add personal contact details that differ from the HR-synced data.

Turn this off to maintain strict HR-controlled consistency.
What’s Currently Supported
-
Active connection with Entra ID (Azure AD)
-
Auto-approve new users (or manual approval flow)
-
Team + Page Template assignments
-
Attribute sync for name, email, phone, title, location, photo
-
Manual “Force Sync HR Directory” refresh
-
Pending / Archived user management
-
Optional custom contact fields
Best Practices
-
Keep your directory clean and updated — each user must have a valid email.
-
Use Auto-Approval for faster onboarding or Pending Approval for manual control.
-
Run Force Sync after significant changes in your HR system.
-
Assign a default team and page template for consistent branding.
-
Use Archived tab to temporarily disable users instead of deleting.
✅ Your HR integration is active once you see:
“Directory Activated” with a green checkmark and your organization’s user count displayed.
Troubleshooting
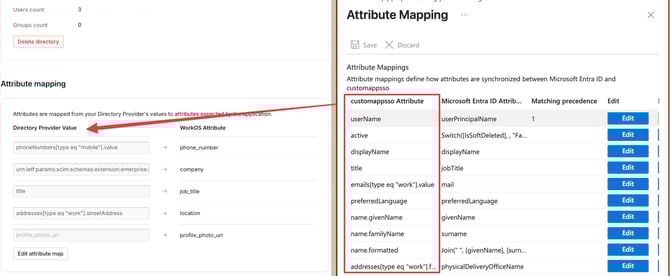
Ensure all attributes are mapped similarly.
WorkOS should have more instructions when originally set up.