 Directories in Linq
Purpose:
Directories allow you to organize and display groups of Linq Pages together — such as teams, departments, or locations. Once a directory is created, it can be added to any page or content block, making it easy for others to view grouped profiles in one place. Available to organizations of 5+.
What Are Directories?
A Directory is a sortable collection of Linq Pages. It helps teams and organizations:
-
Display internal pages publicly
-
Keep member pages organized by department or function
-
Easily link all team members from one shared page
💡 Example: The “Linq HQ Organization” directory may include all employee pages, while “Engineering Team” shows only developer pages.
How to Access Directories
-
Log into your Admin Dashboard at linqapp.com/admin.
-
Click on the Directories tab in the left-hand menu, under Members.
-
You’ll see a list of all your organization’s directories, including how many members each one contains.
Creating a New Directory
|
Picture for reference:
|

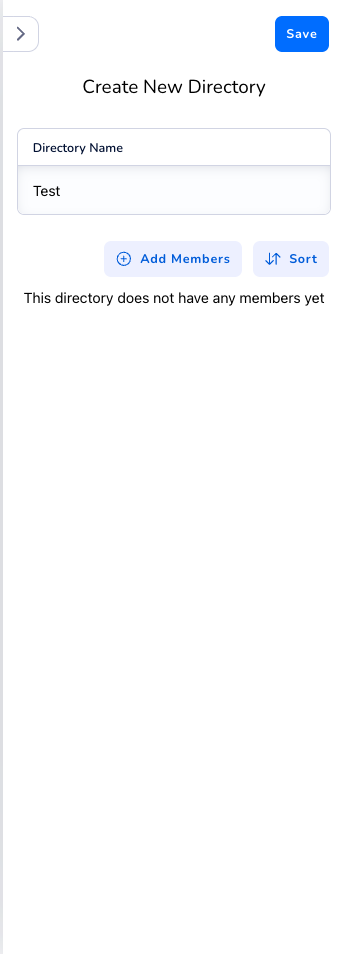
Your new directory will appear in your list immediately and can be added to any Linq Page.
Editing an Existing Directory
-
Select the directory you want to edit from the list.
-
Update the Directory Name if needed.
-
Use the following options:
-
Add Members: Add new Linq Pages to the group.
-
Sort: Reorder how members appear in the directory. Drag and drop names, then click Save.
-
Delete (🗑️): Remove a member or delete the entire directory.
-
Changes are saved automatically once you click Save in the top-right corner.
Reordering Members
|
To customize the order members appear in your directory:
This feature is useful for highlighting key team members or ordering alphabetically by role. |

|
Deleting a Directory
If you need to remove an entire directory:
-
Open the directory you wish to delete.
-
Click Delete Directory at the bottom of the Edit panel.
-
Confirm when prompted.
⚠️ Note: Deleting a directory will not delete individual member pages — only the directory grouping.
Use Cases
Directories can be used in a variety of ways across your organization:
-
Internal Team Lists: Organize departments (e.g., HR, Engineering, Design).
-
Store or Franchise Directories: Display locations on a corporate site.
-
Project Teams: Group temporary or cross-functional teams for quick visibility.